
The plank is deceptively simple: a still position, usually held for time. Yet doing it well and increasing how long you can hold it takes more than grit—it requires alignment, breathing, progression, and a few practical tricks. This article walks you through each step, explains common errors, and gives a realistic plan so you can progress without pain or plateau.
Why the plank matters beyond a strong core
People often think of the plank purely as an abdominal exercise, but it’s a whole-body foundational move. A properly executed plank trains the posterior chain, shoulder stability, and the deep stabilizers of the spine, all of which matter for posture, athletic performance, and daily tasks.
Holding the position teaches your nervous system how to resist unwanted movement under load, which translates to safer lifting and fewer low-back issues. That makes learning how to do the plank correctly and for longer not just a vanity goal, but a practical investment in movement health.
Basic anatomy involved in a plank
Understanding the primary muscles helps you cue them: the rectus abdominis and transverse abdominis support the front, the glutes and hamstrings stabilize the hips, and the erector spinae maintain the arch of the back. The shoulders and scapular stabilizers keep the upper body steady while the hips bridge the gap between upper and lower segments.
Small muscles—like the rotator cuff and the pelvic floor—play a surprising role in endurance and alignment. Activating these deeper stabilizers reduces load on large muscles and helps you hold correct form for longer. Treating the plank as a coordinated pattern rather than an abs-only move changes how effectively you can progress.
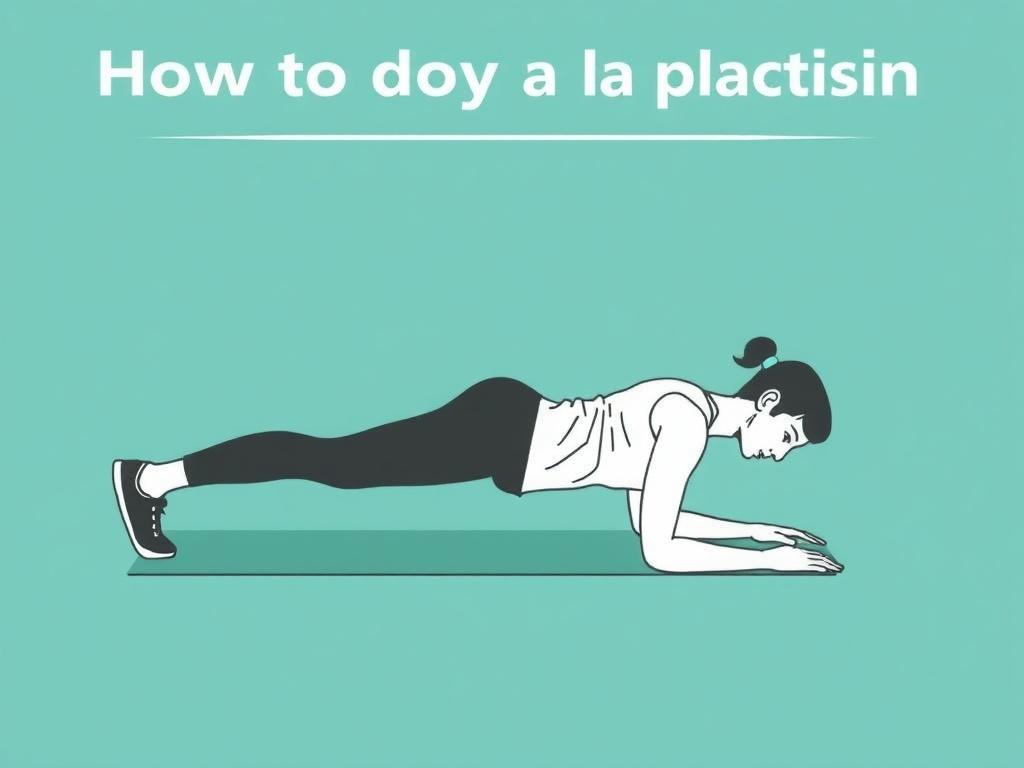
Step-by-step setup: starting position
Begin on the floor with forearms flat and elbows under shoulders. If you prefer the high plank, place hands under shoulders and fingers spread; for forearm plank, align elbows directly under shoulders with forearms parallel. Feet should be hip-width apart to provide a stable base without widening the pelvis excessively.
Press the forearms or hands into the floor to create tension through the shoulders and upper back. Lengthen through the crown of the head and imagine a straight line from ears to heels. These initial checks set the foundation for a sustainable hold rather than a collapsed, ineffective posture.
Pelvic position and spinal alignment
A common failure point is losing a neutral pelvis. To check this, engage the lower abdominals as if drawing the belly button gently toward the spine. Avoid tucking the tailbone excessively—that flattens the lumbar curve and increases hip strain.
If you feel a sag between your shoulders and hips, slightly squeeze the glutes and lift the chest while keeping the neck neutral. The goal is a straight, neutral spine that transmits force evenly from shoulders to heels.
Breathing and intra-abdominal pressure
Breathing matters in the plank. Rather than holding your breath, take steady, controlled breaths: inhale through the nose and exhale through the mouth or nose, keeping the ribcage stable. Maintain a light, consistent abdominal brace on the exhale to protect the lower back while avoiding excessive rigidness that makes the position unsustainable.
Think of the breath as part of your endurance system. Longer holds become possible when your breathing is calm and rhythmic instead of shallow or panicked. If breathing becomes ragged, lower the intensity or take a brief rest rather than pushing into poor form.
Common mistakes and how to fix them
Many people fall into predictable traps: hips too high, hips sagging, head dropped forward, or rounded shoulders. Each error shifts load away from stabilizers and toward compensatory muscles, which limits hold time and can cause pain. Recognizing small deviations early is key.
Correct the hips by imagining a straight plank board between your shoulders and ankles; if the hips deviate, make micro-adjustments rather than large jolts. For the shoulders, think about pulling the shoulder blades slightly down and together to avoid shrugging or collapsing toward the ears.
List of quick form cues
Use these concise cues during practice to keep alignment crisp and accessible. Repeat them before and during each hold to build muscle memory and reduce sloppiness. Short cues are easier to remember under fatigue.
- Elbows under shoulders
- Neutral neck: gaze slightly ahead
- Ribcage down, lower abs engaged
- Hips in line with shoulders and heels
- Slight glute squeeze
Progressions: how to increase hold time safely
Endurance grows with consistent, progressive overload rather than sudden attempts at extreme holds. Start with a baseline test to measure a truthful maximum hold with clean form, then use structured increments—usually 5–15% increases in time or additional sets rather than attempting huge jumps in single sessions.
Two practical progression models work well: increasing total time across multiple sets, or adding seconds to a single set each session. Mix both over weeks to build both absolute endurance and the ability to resist fatigue during sustained work.
Sample 8-week progression table
This table offers a clear, conservative plan for a beginner with a clean 45-second plank baseline. Adjust starting values up or down depending on your baseline and recovery ability. Aim to repeat the plan two to three times a week with at least one full rest day between hard plank sessions.
| Week | Session A | Session B | Notes |
|---|---|---|---|
| 1 | 3 x 50% max hold | 4 x 40% max hold | Focus on perfect form |
| 2 | 3 x 60% max hold | 4 x 50% max hold | Small time increases |
| 3 | 3 x 70% max hold | 3 x 60% max hold | Add core breathing drills |
| 4 | 2 x 80% max + 1 x 50% | 4 x 60% max | Deload if form breaks |
| 5 | 3 x 80% max | 3 x 70% max | Introduce short holds with leg lifts |
| 6 | 2 x 90% max + 1 x 60% | 4 x 70% max | Test new max end of week |
| 7 | 3 x 85% max | 2 x 95% max | Taper intensity before retest |
| 8 | Test max hold | Active recovery session | Reassess and plan next block |
Variations to build strength and endurance
Once basic form is secure, variations add specific challenges and help break plateaus. Side planks emphasize the obliques and shoulder stability, while plank reaches and single-leg planks introduce instability to force improvements in neuromuscular control. Rotate variations across sessions to stimulate adaptation.
Weighted planks or elevated-feet planks increase load but demand near-perfect form; use these only after a consistent base of quality holds. Short, intense variants—like plank jacks or mountain-climber tempo drills—train plank-like endurance in dynamic contexts without sacrificing static strength.
Progression ladder for variations
Use this ladder to add complexity safely. Start at the top and only descend to a harder option when standard holds are comfortable for two to three weeks. Staying conservative here avoids injuries from premature overload.
- Forearm plank with neutral spine
- High plank (straight arms)
- Side plank (forearm)
- Single-leg forearm plank
- Alternating arm/leg reach planks
- Elevated-feet plank
- Weighted forearm plank
Mobility, activation, and pre-plank warm-up
Preparing the body for static holds improves performance and reduces risk. A brief dynamic warm-up—cat-cows for spinal mobility, shoulder circles, and light glute bridges—primes the joints and muscles used in a plank. This is especially important if you train early in the morning or after long periods of sitting.
Activation drills like banded lateral walks for the glutes and bird-dogs for contralateral control help recruit the small stabilizers that matter most during long holds. Ten to twelve minutes of focused prep can add significant time to your plank without increasing perceived effort.
Programming the plank within a balanced routine
The plank is a component, not the whole program. Pair it with posterior-chain work (deadlifts, Romanian deadlifts), anti-rotation exercises (pallof press), and hip-strengthening moves for a balanced midline. Training the plank multiple times per week in varied contexts produces better results than daily maximal holds alone.
Integrate planks as core finishers on strength days, as quality-focused mid-session density work, or as active recovery on lighter days. Rotate focus every 4–6 weeks between absolute hold time, quality under fatigue, and loaded stability to avoid monotony and overuse.
Dealing with shoulder or wrist pain
Shoulder or wrist discomfort often indicates compensation, tightness, or weak stabilizers. First, regress to a forearm plank if wrists are bothersome, or place hands on a raised surface to reduce load. Address mobility limitations with dedicated shoulder and wrist mobility drills to restore pain-free range.
If pain persists, reduce plank intensity and consult a qualified clinician. Pain is not a sign of toughness; it’s a signal to adjust technique or load. Consistent, pain-free practice is what builds durable endurance, not bravado.
Author experience: overcoming shoulder fatigue
Years ago I used to default to high planks and often felt upper trapezius tension after longer holds. Switching to forearm planks for several weeks and adding external-rotation cuff work shifted the load and relieved the tightness. That simple change allowed gradual progression back to high planks without recurrence of pain.
Small, targeted corrections like that preserve both performance and longevity. They’re also easier to implement than wholesale program overhauls, and they teach you to listen to your body rather than push through avoidable discomfort.
How to pace a maximal hold attempt
When attempting a new maximal plank, approach it like a time trial. Warm up thoroughly and perform a few submaximal holds at 50–70% to set neuromuscular readiness. Start your timed attempt when you feel settled, and use steady breathing, consistent cues, and micro-adjustments instead of trying to power through waves of fatigue.
Record the attempt and note what broke first—hips, shoulders, or breath. That breakdown reveals the weakest link and directs your training. For many people, increasing total volume across multiple short sets yields faster gains than chasing one-or-two maximal efforts per week.
Mental strategies for longer holds
The plank is as much mental as physical. Distracting yourself with a podcast or music can help, but learning to accept discomfort and use focused breathing often produces the best long-term gains. Break the hold into micro-goals—ten deep breaths, or a set of four breaths with a posture check—to make long durations feel manageable.
Visualization helps too: imagine your body as a taut cable or plankboard resisting bending forces. That image encourages a global tension strategy rather than localized tightening. Over time, these mental tactics reduce perceived effort and expand your capacity to hold steady under fatigue.
Diet, recovery, and how they affect hold time

Endurance benefits from sleep, hydration, and balanced fueling. Low glycogen or dehydration increases perceived effort and shortens endurance, so plan harder plank sessions on days you are well-rested and adequately fueled. Short-term caffeine intake can also marginally improve time under tension, but avoid relying on stimulants regularly.
Recovery is equally crucial: soft-tissue work, light aerobic sessions, and deliberate rest days allow adaptations to consolidate. If planks feel markedly worse on consecutive sessions, back off duration or frequency to allow the nervous system to recover.
Tracking progress and realistic milestones
Track both objective metrics—time held, number of sets—and qualitative notes about form and fatigue. Weekly videos provide an excellent feedback loop because small compensations often go unnoticed in the moment. Use a simple training log or app to chart progress and keep the motivation steady.
Realistic milestones vary by starting point: moving from 30 seconds to 90 seconds in a few months is a solid target for many. Elite times matter less than consistent improvement and the ability to perform other movements without core failure or pain.
Troubleshooting plateaus

If you’re stuck, change the stimulus. Swap single long holds for multiple submaximal sets, introduce instability, or add brief eccentric loading through slow descents from high plank to forearm plank. Sometimes a planned deload week—reducing frequency and intensity—resets progress and leads to stronger subsequent gains.
Another effective tactic is to focus on complimentary lifts that strengthen bottleneck muscles, such as glute bridges for hip stability or face pulls for upper-back endurance. Addressing weak links often breaks plateaus faster than simply increasing plank time.
Real-life example: a client’s 12-week transformation
A client I coached started with a sloppy 25-second forearm plank and shoulder soreness after ten reps. We prioritized form, introduced a two-day-per-week plank protocol, and added targeted shoulder and glute activation. By week twelve she held a clean 120-second plank and reported better posture during her desk job.
The key was incremental load and attention to mobility. We never pushed for daily max holds; instead we increased total weekly time by small amounts and rotated variations. The outcome was not only a longer plank but improved functional endurance throughout her day.
When to seek professional help
Persistent pain, especially sharp sensations in the spine, shoulder, or wrist, warrants professional assessment. A physical therapist or qualified coach can identify biomechanical faults and provide corrective strategies, including manual therapy, movement drills, or individualized programming. Don’t treat planks as a test of endurance if you have underlying joint issues.
Similarly, if progress stalls despite diligent programming and rest, expert input can reveal subtle compensations or systemic issues like poor sleep or nutritional deficits. A trained eye or a strength coach’s programming tweaks are often the most efficient path forward.
Daily habits that support longer planks
Small daily practices add up: stand and move every 30–60 minutes to counteract sitting-related stiffness, practice diaphragmatic breathing for five minutes to improve breath control, and do short glute activation sets before workouts. These habits make each plank session start from a better position.
Consistency matters more than volume. Even brief, focused practice several times a week builds endurance and technique faster than infrequent maximal efforts. Treat planks as skill work, not just a test of willpower.
Quick home routine for a 10–15 minute plank session

This compact session prioritizes quality and incremental volume, ideal for busy schedules or travel. It combines activation, focused holds, and a controlled test at the end to measure progress without burning you out.
- Warm-up (3 minutes): cat-cows, shoulder circles, glute bridges
- Activation (3 minutes): 2 x 30s bird-dogs, 2 x 20 banded lateral steps
- Main (6 minutes): 4 x 60% max hold with 60s rest between
- Test (optional): 1 max hold with video for form review
How often to practice for steady progress
Two to four focused plank sessions per week is effective for most people. If you’re doing heavy lifts or intense conditioning, lean toward the lower end to avoid overloading the nervous system. Frequency should align with overall training stress, not exist in isolation.
Micro-practice—short, excellent-quality holds sprinkled through the day—also pays dividends. Ten-second focused holds five to six times daily reinforce motor patterns and improve endurance with minimal time cost.
Advanced considerations: integrating tempo and load
Advanced trainees can manipulate tempo—slowly lowering from a high plank to forearms and holding the transition—to build eccentric control. Adding light external load, such as a weight plate on the back, increases intensity but requires impeccable alignment. Use these tools sparingly and always prioritize technique.
Programming these elements in 3–6 week blocks prevents overtaxing stabilizers and allows clear adaptation windows. Advanced loads should be measured by quality, not ego; a slightly shorter hold with perfect form is more beneficial than a long, sloppy one with extra weight.
Final practical checklist before each session
Use this short checklist to prepare for a session and reduce common errors. Small rituals make practice predictable and help you squeeze more out of every minute spent under tension. Consistency in preparation equals consistency in outcomes.
- Warm up shoulders, hips, and thoracic spine
- Test breath control with 10 diaphragmatic breaths
- Choose the appropriate plank variation for the day
- Set realistic time targets and log them
Learning how to do the plank correctly and for a long time is a process of small, consistent improvements. Focus on alignment, breathing, and progressive overload while addressing mobility and recovery. With intentional practice, the plank becomes less of a chore and more of a reliable tool for strength, posture, and daily resilience.