
Barbell squats sit at the heart of strength training—simple to describe, fiendishly complex to perform well. This article walks you through every motion, cue, and common pitfall you’re likely to meet on the gym floor and gives you concrete drills to fix them. Think of it as an operational manual for the barbell back and front squat, grounded in anatomy, physics, and real coaching experience.
Why squats matter
Squats recruit large muscle groups and produce hormonal and neuromuscular adaptations that transfer to performance in sport and daily life. When done correctly, they improve hip, knee, and ankle strength and teach coordinated triple-extension—hip, knee, and ankle—on powerful lifts like cleans and snatches.
Beyond strength, squats build durability. Repeatedly loading the legs under control conditions strengthens tendons, bones, and connective tissue while improving movement patterns. This makes squats a high-value exercise for athletes and general trainees alike.
Understanding the anatomy behind the movement
Three primary muscle groups drive a full barbell squat: the quadriceps across the front of the thigh, the glutes and hamstrings at the back, and the spinal erectors holding the trunk upright. Smaller muscles—adductors, core stabilizers, and ankle dorsiflexors—play essential supporting roles.
Recognizing how each muscle contributes helps you tailor technique and accessory work. For example, a lifter who wants more lockout strength focuses on glute and hamstring work, while someone who stalls above parallel often benefits from quad-specific accessory lifts and mobility adjustments.
Types of barbell squats and when to use each

Several squat variations exist, and choosing the right one depends on goals, anatomy, and mobility. High-bar back squats place the bar on the upper trapezius and favor a more upright torso, targeting the quads. Low-bar back squats sit lower across the rear delts and shift torque to the hips and posterior chain.
Front squats place the bar across the anterior deltoids and collarbones, demanding a vertical torso and reinforcing quad strength and core stiffness. Safety-bar and Zercher variations are useful for lifters with shoulder restrictions or as variations to emphasize different sticking points.
Preparing to squat: mobility, warm-up, and equipment
Good squatting starts before you touch the bar. A thorough warm-up increases tissue temperature and neural drive, while mobility work helps you find and maintain positions under load. Focus on ankle dorsiflexion, hip internal and external rotation, and thoracic extension for most lifters.
Equipment choices—shoes, belt, knee sleeves—are tools, not crutches. Flat shoes with a firm sole or a slight raised heel can help. A weight belt improves intra-abdominal pressure for heavy sets but should be used alongside proper bracing habits. Use sleeves and wraps for joint confidence, not to hide poor mechanics.
Stance, foot angle, and balance
Your stance should reflect your build more than a one-size-fits-all rule. Narrower stances emphasize quad involvement and a more vertical torso, while wider stances recruit the hips and adductors more heavily. Most lifters find a shoulder-width to slightly wider position works best for raw strength training.
Foot angle matters. Turn your feet out slightly—enough to allow your knees to track comfortably over your toes during descent. Too much external rotation can limit depth and risk ligament strain; too little angle can create hip impingement for some lifters. The goal is stable, even weight through heel and midfoot.
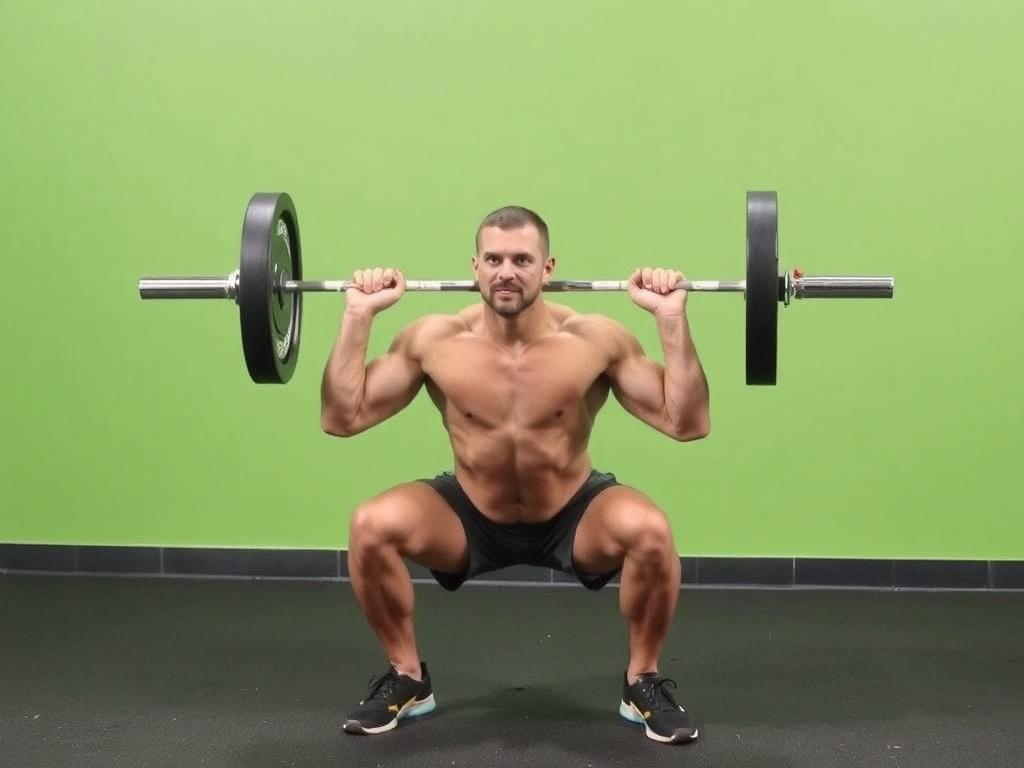
Bar placement, grip, and upper-back tension
Bar position dictates torso angle and muscle emphasis. For high-bar squats, place the bar on the traps at the base of the neck. For low-bar, sit the bar lower across the rear delts. Maintain a secure shelf created by the upper back; it supports heavier loads and protects the neck and wrists.
Your grip should be firm but not fight the bar. Hands pull the bar into the back to create upper-back tension; this keeps the bar from rolling and helps maintain posture. If your wrists or shoulders limit positioning, wider grip, thumb placement adjustments, or using a strapless technique can help.
Breathing and bracing: what happens inside the core
Breathing and bracing are the backbone of a safe, powerful squat. A diaphragmatic breath fills the belly, and bracing the abdominal wall increases intra-abdominal pressure, stabilizing the spine under load. This is not about shallow chest breaths; it’s a full belly expansion against a rigid midsection.
Experiment with the Valsalva maneuver for heavier attempts: take a big breath, brace, perform the lift, and exhale at the top. For submaximal work, shorter breaths between reps can keep tension while managing fatigue. The consistent theme is a stable, non-collapsing trunk.
The descent: control, rhythm, and hip-hinge
Begin the descent by initiating a controlled hip hinge—push the hips back slightly while bending the knees—rather than dropping straight down. This helps keep tension in the posterior chain and prevents the knees from shooting excessively forward, which can destabilize the lift.
Descend with a measured tempo; rapid, uncontrolled dropping can turn a squat into a bounce that stresses joints and robs you of power. Use the legs and hips to absorb the load, and maintain a neutral spine. Eyes can be forward or slightly down; avoid excessive neck extension.
Bottom position: depth, knee tracking, and tension
Depth is individual but functional depth usually means the hip crease drops at least to parallel with the knee or slightly below. Don’t chase depth at the expense of neutral spine or coordinated bracing—better to stay a little higher and strong than to break form trying to hit an arbitrary depth.
At the bottom, keep tension through the entire kinetic chain. Avoid relaxing into a loose bottom where hips and knees collapse. If your knees cave (valgus), strengthen glute medius and use banded cues; if your torso folds forward, work on thoracic mobility and belt bracing cues.
The ascent: drive, cadence, and axis of power
The ascent should feel like driving the feet through the floor while extending the hips and knees simultaneously. Think of the lift as a coordinated push rather than a knee-driven extension followed by a hip lockout. This coordinated extension preserves balance and channels force efficiently.
Early in the ascent, be mindful of the sticking point—most lifters slow around the mid-range. Accelerate out of the bottom by maintaining bracing and a neutral back, and if necessary use targeted accessory work to strengthen the point where you stall most often. Maintain the bar path close to the midfoot to reduce torque on the knees and lower back.
Common technical errors and practical fixes
Knee valgus, excessive forward torso lean, heels rising, and bar migration are the typical errors people see. Correcting them means diagnosing the root cause—tight hips, weak glutes, poor ankle mobility, or inadequate thoracic extension—and addressing that with targeted drills and programming. Quick cueing often masks problems; technical fixes paired with accessory work produce lasting change.
Use video feedback to see what your body does under load; a mirror exaggerates balance issues. Small changes—wider stance, slight toe flare, banded glute warm-ups—can solve many problems. When a fix helps during warmups but fails with heavy weight, it’s a strength or motor control issue rather than a mobility one.
Issue: knees collapsing inward
When knees cave, it commonly indicates weak hip abductors. Implement targeted strengthening like clams, banded lateral walks, and single-leg Romanian deadlifts. During warm-ups, use light banded squats to train the knees to track properly through the full range of motion.
Also check foot stability and cue pushing the knees out over the toes. Small changes in stance width and foot angle often create immediate improvements, especially for athletes whose hips favor external rotation.
Issue: forward torso and bar drift
A forward torso can signal poor thoracic extension or low-bar placement without adequate posterior strength. Work on thoracic mobility drills and row variations to build the upper back. Temporarily lowering the weight and drilling tempo squats with a pause at the bottom can retrain a stable torso position.
Another useful fix is bracing cues: “chest up” and “tighten the lats” are simple, actionable prompts that help maintain an efficient bar path and reduce torque on the lower back.
Issue: high-bar vs low-bar differences
Switching bar placement alters muscle emphasis and torso angle. If your low-bar attempt produces excessive forward lean, you might lack posterior chain strength or require a slightly wider stance to let your hips lead. Conversely, too upright with a high-bar placement could mean heavier quad reliance that necessitates targeted hamstring and glute work for balance.
Experimentation under light loads helps determine which placement suits your structure and goals. Competitive powerlifters often prefer low-bar; Olympic lifters and general strength athletes frequently favor high-bar or front squats for athletic transfer.
Programming squats: frequency, intensity, and progression
Programming should match your objectives. Strength-focused lifters often squat heavy 2–3 times per week, mixing a heavy day, a medium volume day, and a lighter technique or speed day. Hypertrophy-oriented programs use higher reps and shorter rest with a slightly higher weekly volume spread across multiple sessions.
Progression schemes like linear increases, weekly percentage adjustments, or autoregulated methods (RPE-based) all work when applied consistently. The critical element is progressive overload delivered without accumulating technical breakdown or injury.
Accessory lifts that transfer to better squats
Targeted accessory work closes weaknesses and improves barbell mechanics. Good mornings and Romanian deadlifts build posterior chain resilience. Bulgarian split squats and single-leg work fix imbalances and enhance unilateral strength and stability.
Front squats and paused back squats reinforce position and power off the bottom. Glute bridges, hip thrusts, and sled pushes increase hip extension strength and teach explosive mechanics that carry over to heavy sets.
Sample 8-week progression table
Below is a concise template for a generic 8-week strength progression. Adjust loads based on your current 1RM, recovery, and training experience.
| Week | Session A (heavy) | Session B (volume) | Session C (speed/technique) |
|---|---|---|---|
| 1 | 5×5 @ 70% | 4×8 @ 60% | 8×2 @ 50% (fast) |
| 2 | 5×4 @ 75% | 5×6 @ 62% | 8×2 @ 52% (pause) |
| 3 | 4×3 @ 80% | 6×5 @ 64% | 6×2 @ 55% (speed) |
| 4 | 3×3 @ 82.5% | 5×5 @ 66% | 6×2 @ 57% (pause) |
| 5 | 5×2 @ 85% | 4×8 @ 68% | 8×2 @ 60% (speed) |
| 6 | 4×2 @ 87.5% | 5×5 @ 70% | 6×2 @ 62% (pause) |
| 7 | 3×1 @ 90% | 3×8 @ 65% | 5×2 @ 65% (speed) |
| 8 | Deload: 3×3 @ 60% | Deload: 3×8 @ 55% | Deload: 6×2 @ 50% |
Warm-up and pre-activation routine examples
A practical warm-up takes 10–15 minutes and combines dynamic movement with specific activations. Start with light cardio or mobility flow, then progress to bodyweight squats, banded activation, and unloaded barbell repetitions to build patterning. Finish with working sets that approach the load of your first heavy set.
- 5 minutes light bike or row
- Hip circles and ankle dorsiflexion drills (2 minutes)
- Banded lateral walks, 2×20 steps
- Bodyweight squats, 3×10 (slow, controlled)
- Empty bar 3–5 reps, then 1–2 warm-up sets at increasing percentages
Mobility drills that actually help

Mobility work should be purposeful and specific to the constraints that affect your squats. For ankle mobility, try weighted dorsiflexion stretches and controlled knee-to-wall mobilizations. For hips, use 90/90 transitions and pigeon variations to free rotational patterns.
Thoracic mobility often limits torso position. Foam-roller thoracic extensions and doorway stretch reaches ease the chest forward and enable a stronger upper-back shelf. Don’t overdo static stretching right before heavy squats; maintain tension and readiness in the muscles you’ll be using.
Programming accessories and autoregulation
Autoregulation strategies such as RPE or flexible percentage adjustments allow you to progress while respecting day-to-day variability. If your heavy day feels off, reduce intensity slightly rather than forcing a missed rep and accumulating technical breakdown. This preserves quality and long-term gains.
Pick 2–3 accessory lifts per session that address specific weaknesses. Keep accessory volume moderate—too much can fatigue your nervous system and blunt recovery for primary squat work. The goal is targeted improvement, not exhaustive muscle failure every session.
Coaching cues and mental strategies
Short, specific cues work best under load: “brace, chest up, knees out, drive the floor.” These phrases are anchors to remind you of body positions and muscle tensions. Avoid over-coaching; once movement patterns are established, reduce verbal cues and let motor programs execute.
Mental rehearsal helps. Visualizing the bar path and sequencing—hip hinge, descend, brace, explode—primes your nervous system and reduces anxiety with heavier loads. Confidence under the bar grows from consistent practice and incremental successes.
Safety, spotting, and when to use a power rack
Always use safety pins or straps when attempting near-maximal lifts alone. Set pin heights so they catch the bar just below your lowest safe depth without jamming the chest. When training heavy without reliable spotters, use a power rack and ensure pins are correctly adjusted before attempting a set.
Poorly set safeties can create false confidence that leads to dangerous failures. Train smart and respect the weight: failure is part of progress, but it should be managed in a way that preserves performance and health.
Programming for different goals: strength, hypertrophy, and athleticism
For pure strength, prioritize heavier loads with lower reps and longer rests, focusing on compound sets and progressive overload. Hypertrophy responds better to moderate loads, higher volume, and shorter rest, with attention to time under tension and muscle fatigue.
Athletes balance power and functionality: include speed work, unilateral stability drills, and mobility sessions alongside heavier strength days to preserve explosiveness. Specificity matters—adjust squat variants and accessory patterns to mirror the movement demands of your sport.
Real-life examples and coaching anecdotes
In my coaching experience, the single most transformative change for hesitant lifters was teaching proper bracing and an engaged upper back. One client moved from failing at mid-range to adding 25 pounds in six weeks after we prioritized bracing and paused squats at the depth he struggled with.
Another lifter with persistent knee pain improved dramatically by adjusting stance and adding single-leg RDLs and banded hip work. The fix wasn’t flashy: consistent accessory work, stance refinement, and a few weeks of submaximal training rebuilt control and confidence.
How to test and track progress safely

Use periodic testing—submaximal reps, estimated 1RM calculations, and video analysis—to measure progress without risking frequent maximal attempts. Record metrics like barbell speed, rep quality, and subjective readiness to guide programming changes. Data combined with qualitative feedback gives a fuller picture than numbers alone.
Keep a training log that notes warmup progress, mobility issues that arise, and how each set felt. Over months, patterns will appear: chronic fatigue, plateaus, or technical regressions. These signals tell you when to change variables like volume, intensity, or accessory focus.
When to see a professional and red flags
Persistent pain, especially sharp or joint-focused pain during movement, warrants a professional assessment. Distinguish between muscular soreness and structural pain; the latter is not something to grind through. Physical therapists and experienced coaches can assess movement mechanics and recommend corrective strategies.
Red flags include sudden loss of range of motion, intense pain after a specific rep, or neurological symptoms such as numbness or tingling. Address these promptly to prevent long-term issues and ensure you can continue training consistently.
Final practical checklist before your next squat session
Before stepping under the bar, run a quick checklist: warm-up complete, mobility issues addressed, breathing and bracing rehearsed, and pins or spotters set. Choose a load that allows you to maintain quality—always prioritize form over ego, especially on heavy or near-maximal days.
Remember that technique is an ongoing project. The phrase Техника выполнения приседаний со штангой captures a lifetime of refinement, not a single moment of perfection. Build slowly, listen to your body, and let consistent, thoughtful practice compound into real strength and durable movement.